All I do at work is purely digital. At best, it may end up open source, so that other people could see it, but most will stay proprietary - just a some bits stored on servers I’ll never ever see.
Probably that’s why I had the need to work with my hands for well over a decade now.
In particular, I love woodworking, but also tinker with electronics and 3D Printing.
I don’t do it nearly as much as I would like to, primarily because of the space constraints not allowing me to set up a proper workshop.
Still, I built a good few things that I’m proud of.
Of course, I’m not listing a regular DIY stuff one has to do around the house, like fixing shelves, painting walls, or changing light fixtures.
I did have a lot of fun with it, namely with adding Zigbee-enabled switches everywhere, so that I can control the lighting and other things from Home Assistant. But that’s outside the scope of this write-up.
Here is all the stuff I built over the years.
Binary clock
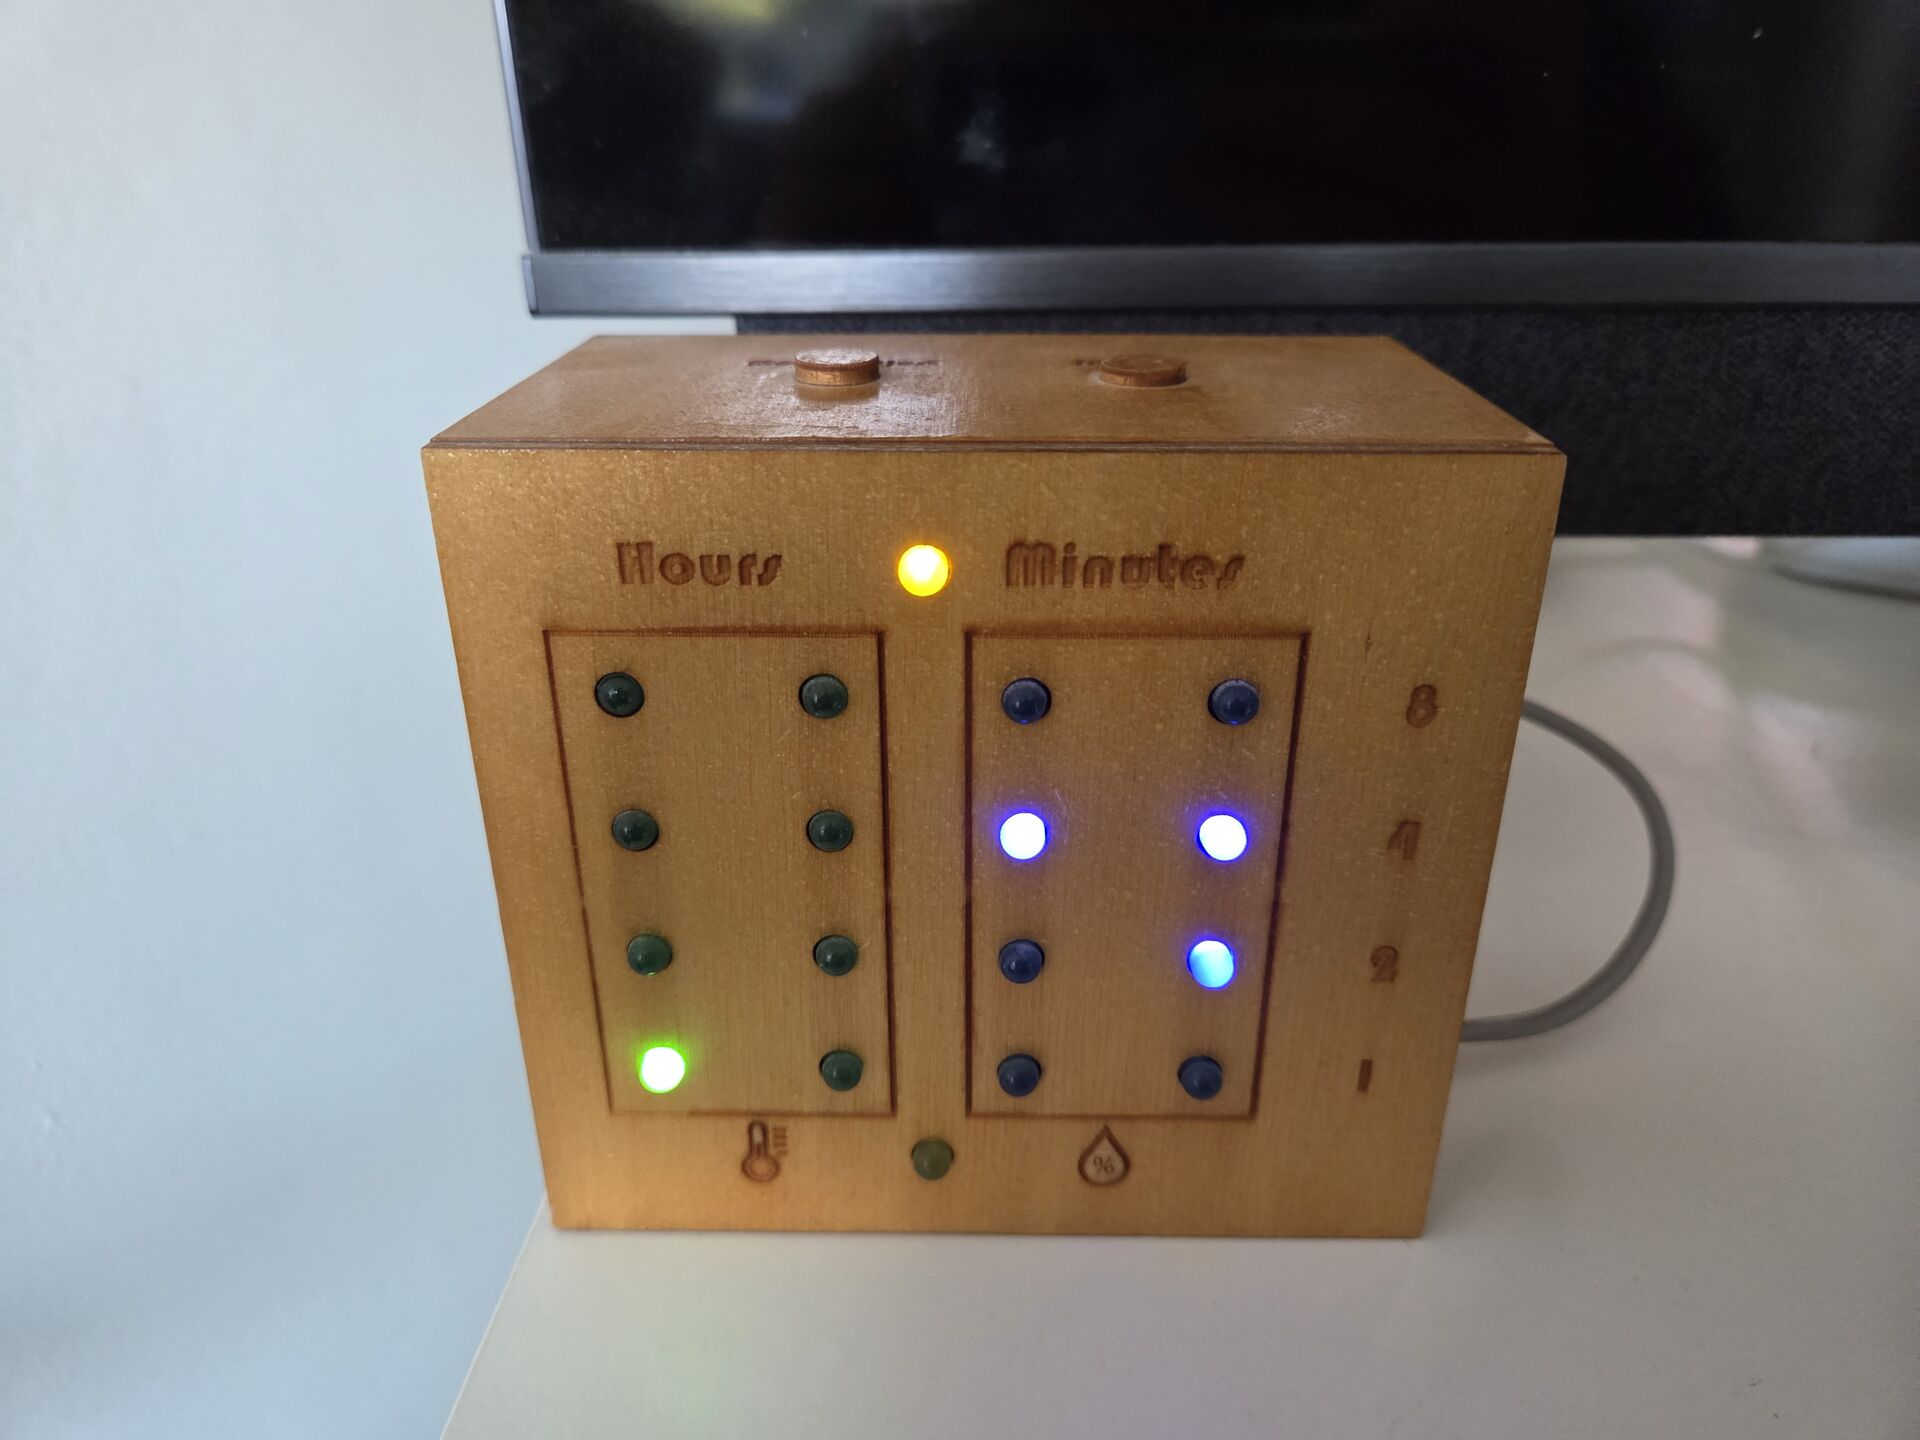
(the clock above shows 10:46 in a 24 hour format)
As a nerd, I like weird things like showing time in binary.
One of my first public posts was about coding a Binary Clock widget in Lua for the Awesome tiling window manager.
So when I got access to a laser cutter, the first thing I wanted to build was a physical Binary Clock. To make things more interesting, I wanted it to measure temperature and humidity, and show both in binary at a press of a button.
Given that I still use it every day, I would call this a success.
A lot of my firsts here:
- programming an Arduino board
- designing and soldering a custom electronic circuit
- designing anything to make on a Laser Cutter
I actually learned to solder electronic components while working on this project, thanks to a good friend a colleague who was kind enough to teach me how to do it, and even supplied me with a good set of flux and solder.
Cribbage board
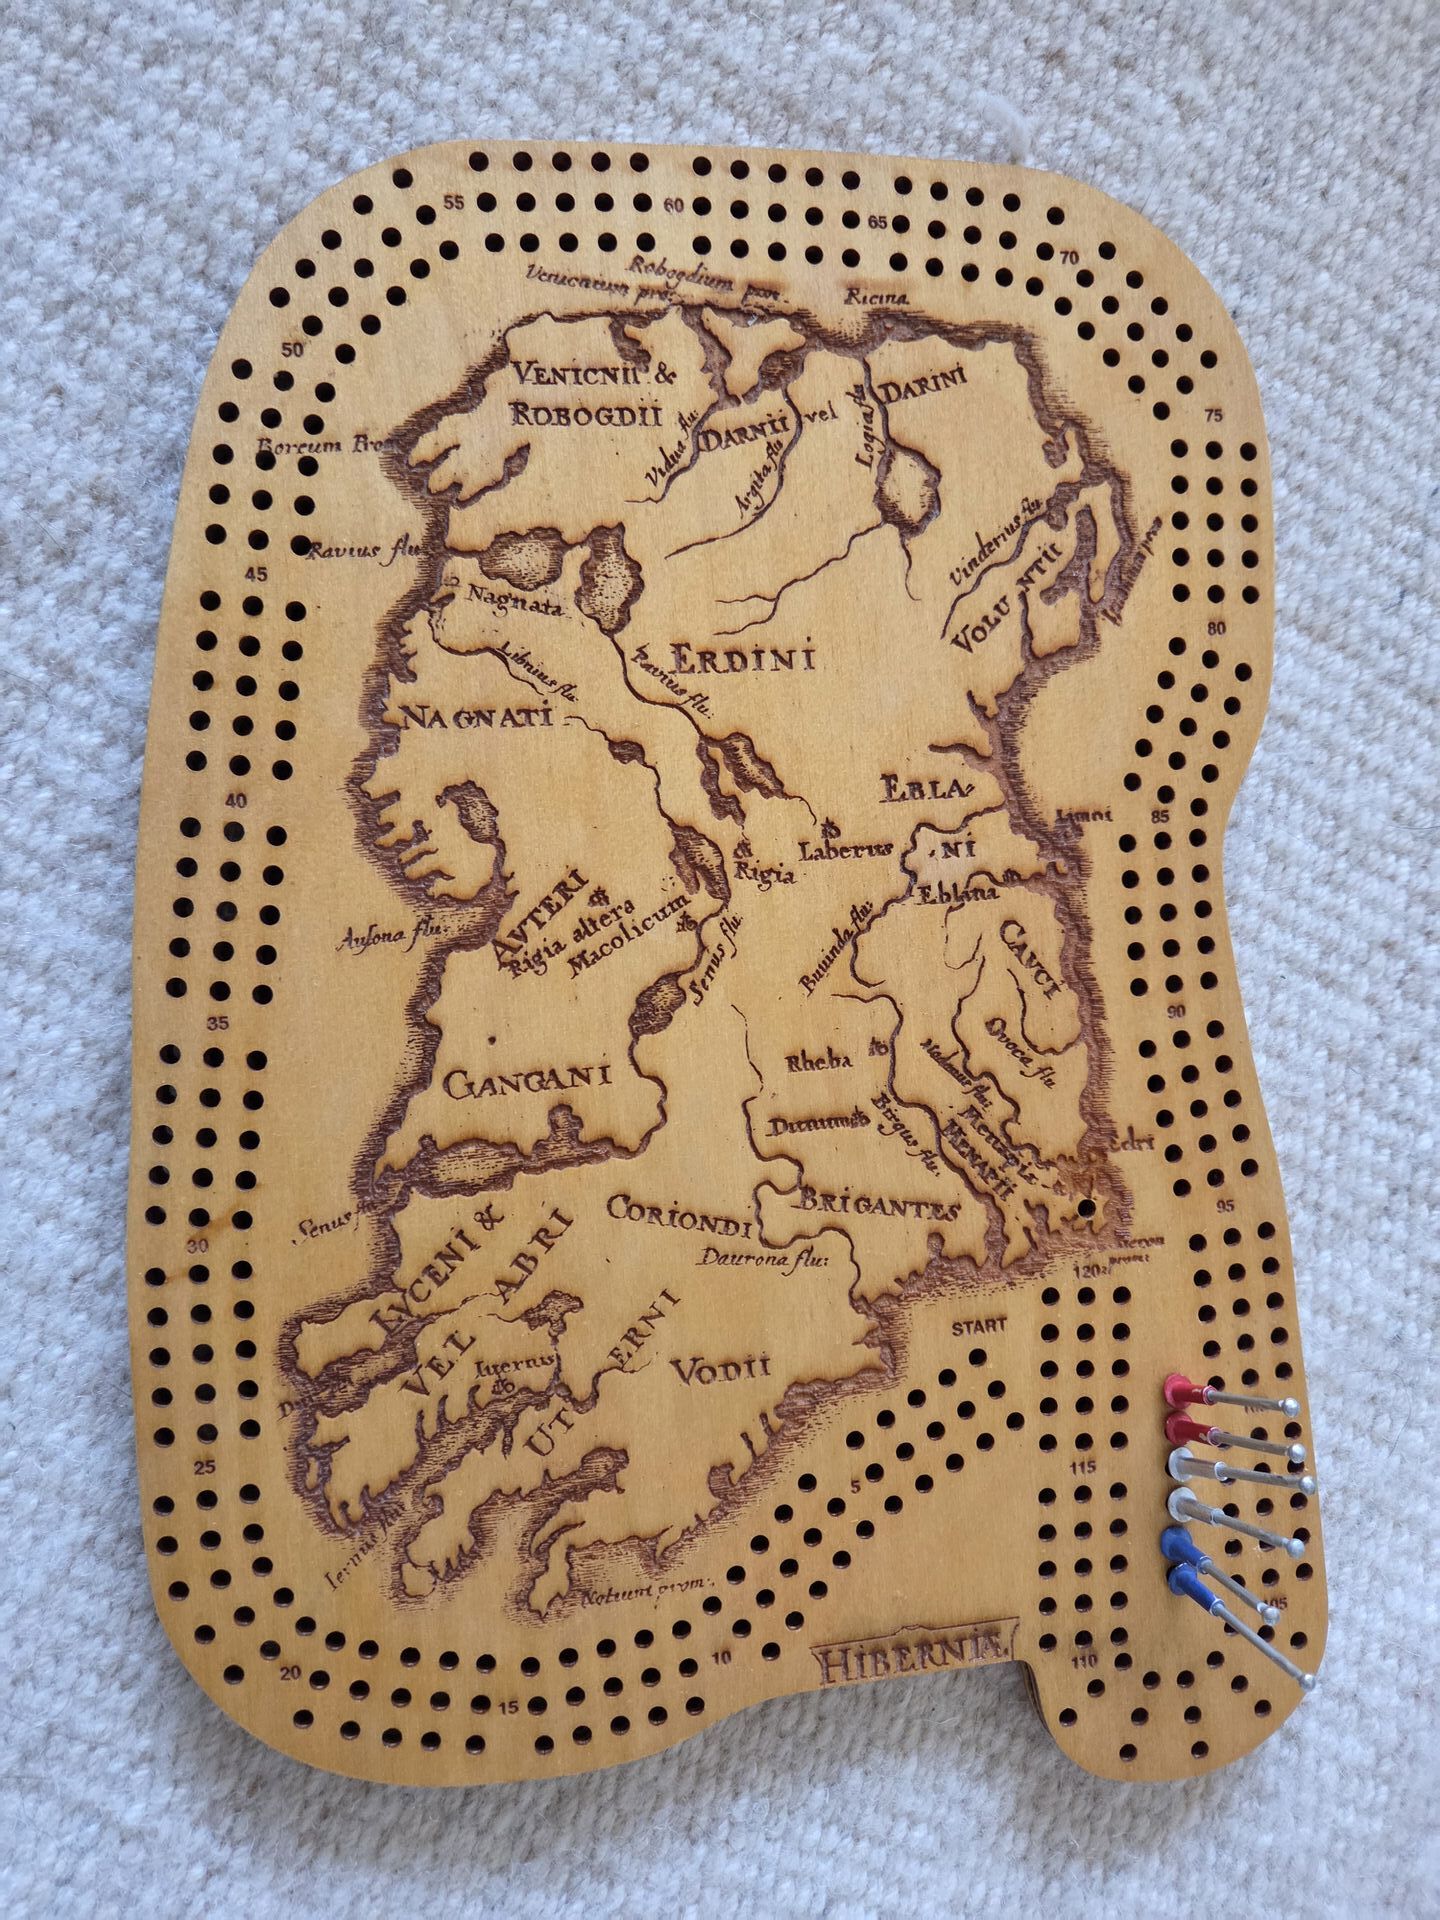
Cribbage is by far my favourite card game. My wife and me have been playing it for many years, so it was only logical to upgrade our experience with a real scoring board.
I found a beautiful map of Ireland (we have just recently moved here back then), and artfully arranged all holes for all 121 points for three players on it.
The board is made of two 3 mm birch plywood sheets, since the laser cutter I had access to couldn’t deal with thicker material.
Engraving took around one hour, and cutting all the holes took even more.
The board is finished with some hardcore yacht varnish for longevity, and the pegs are simply painted rivets of some kind from a local DIY store.
Captains of Crush grippers stand
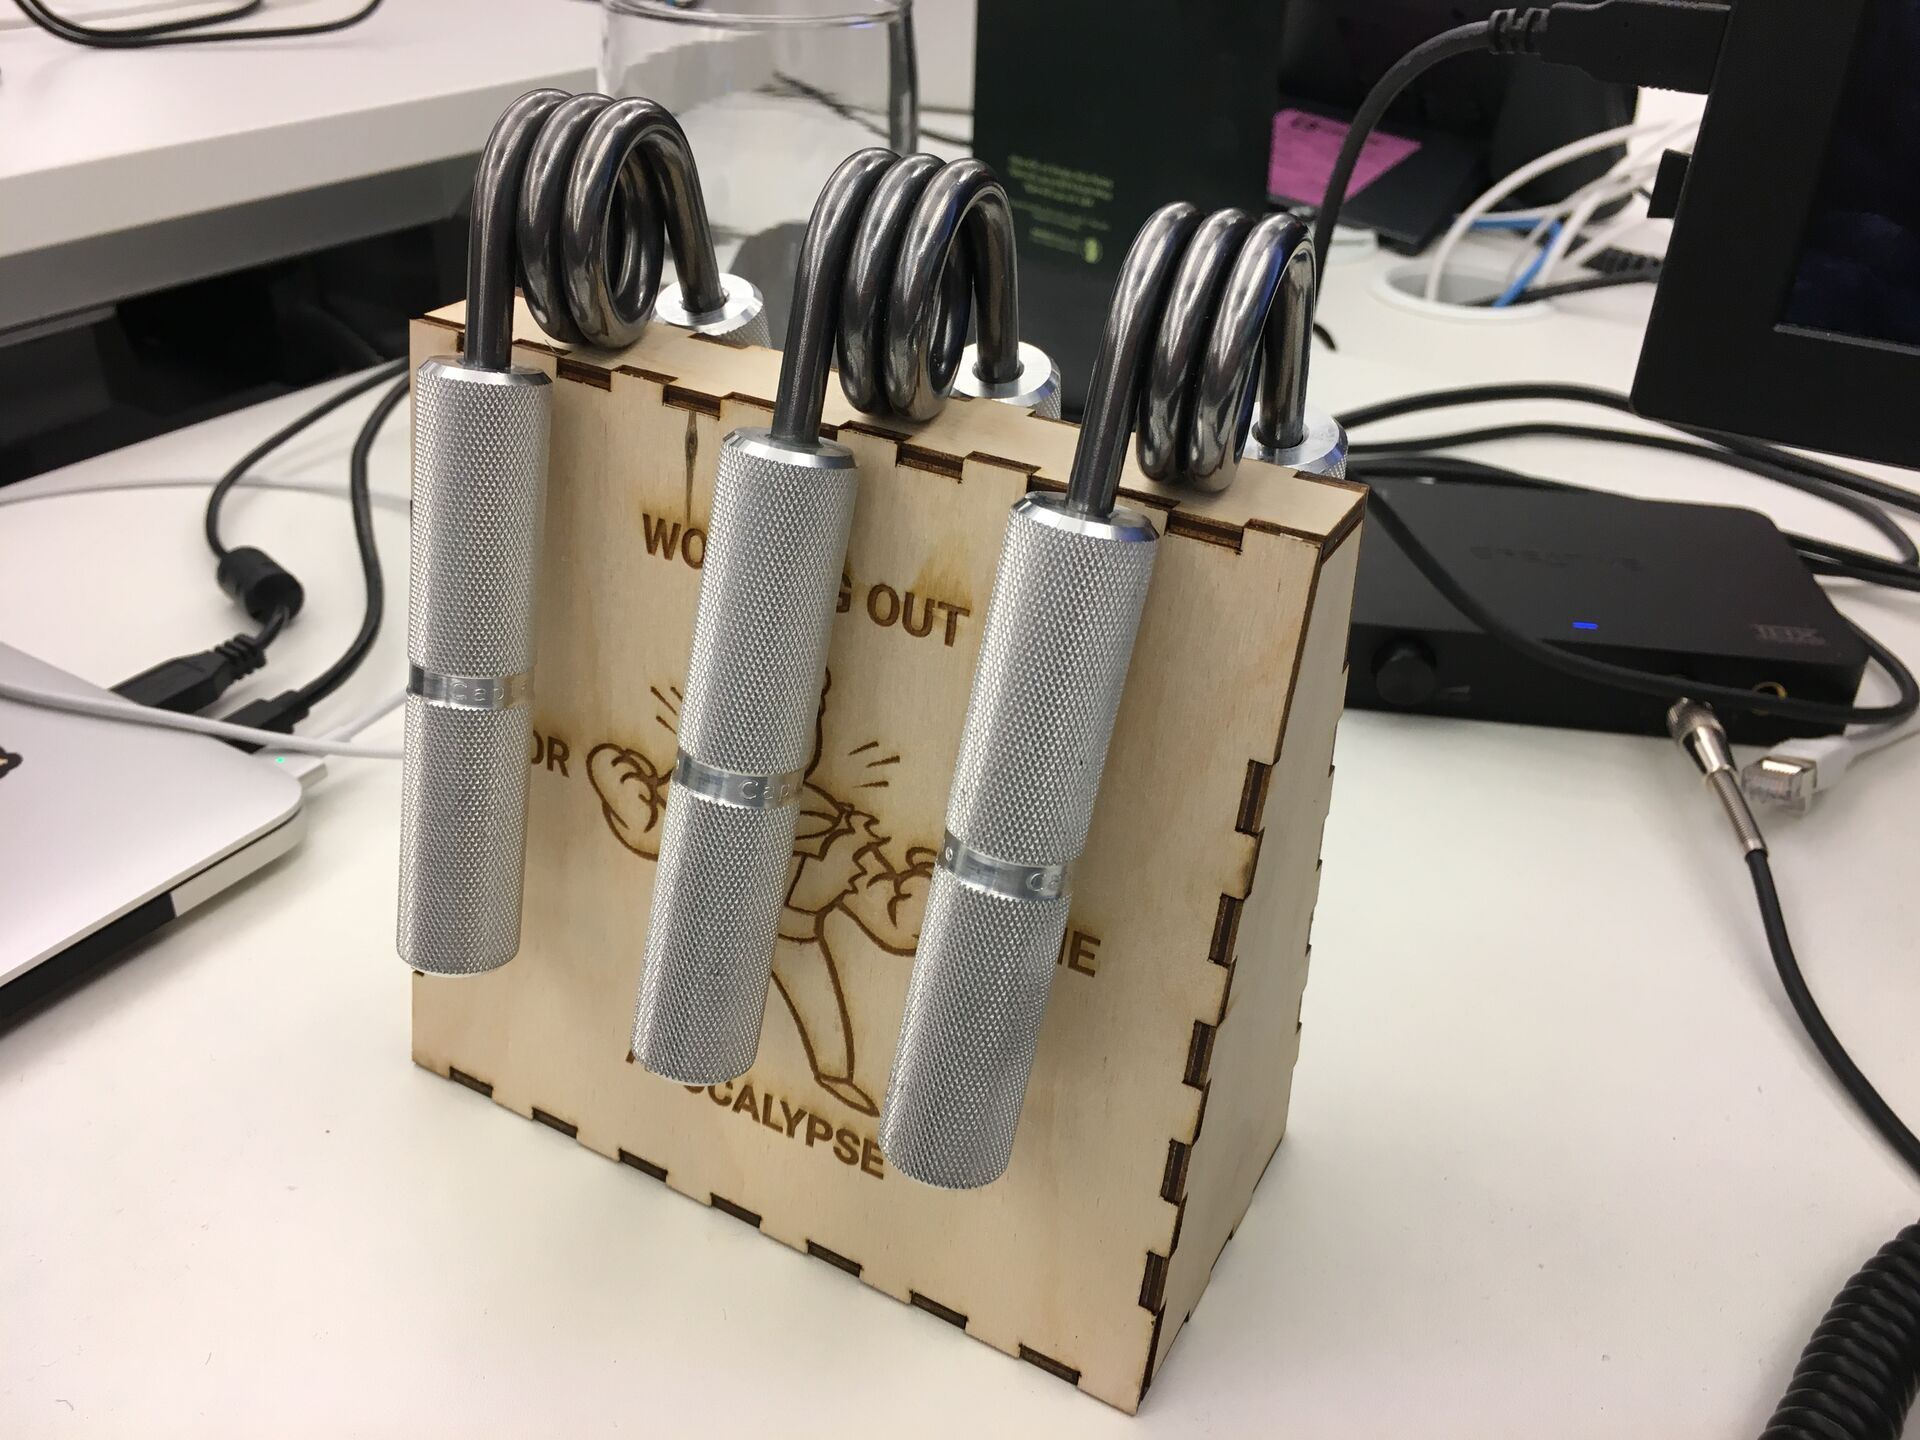
Around 2015 I got into practicing with the strength grippers thanks to one of my colleagues who did that all the time. Once I got my own Captains of Crush set (strengths 1, 1.5 and 2), I needed a way to keep them on my desk, organized and easily accessible.
As a life-long Fallout fan, I adorned a simple laser cut stand with Vault Boy pictures.
Sadly I never got strong enough to close the #2, but maybe one day?
Ship Modelling Cabinet
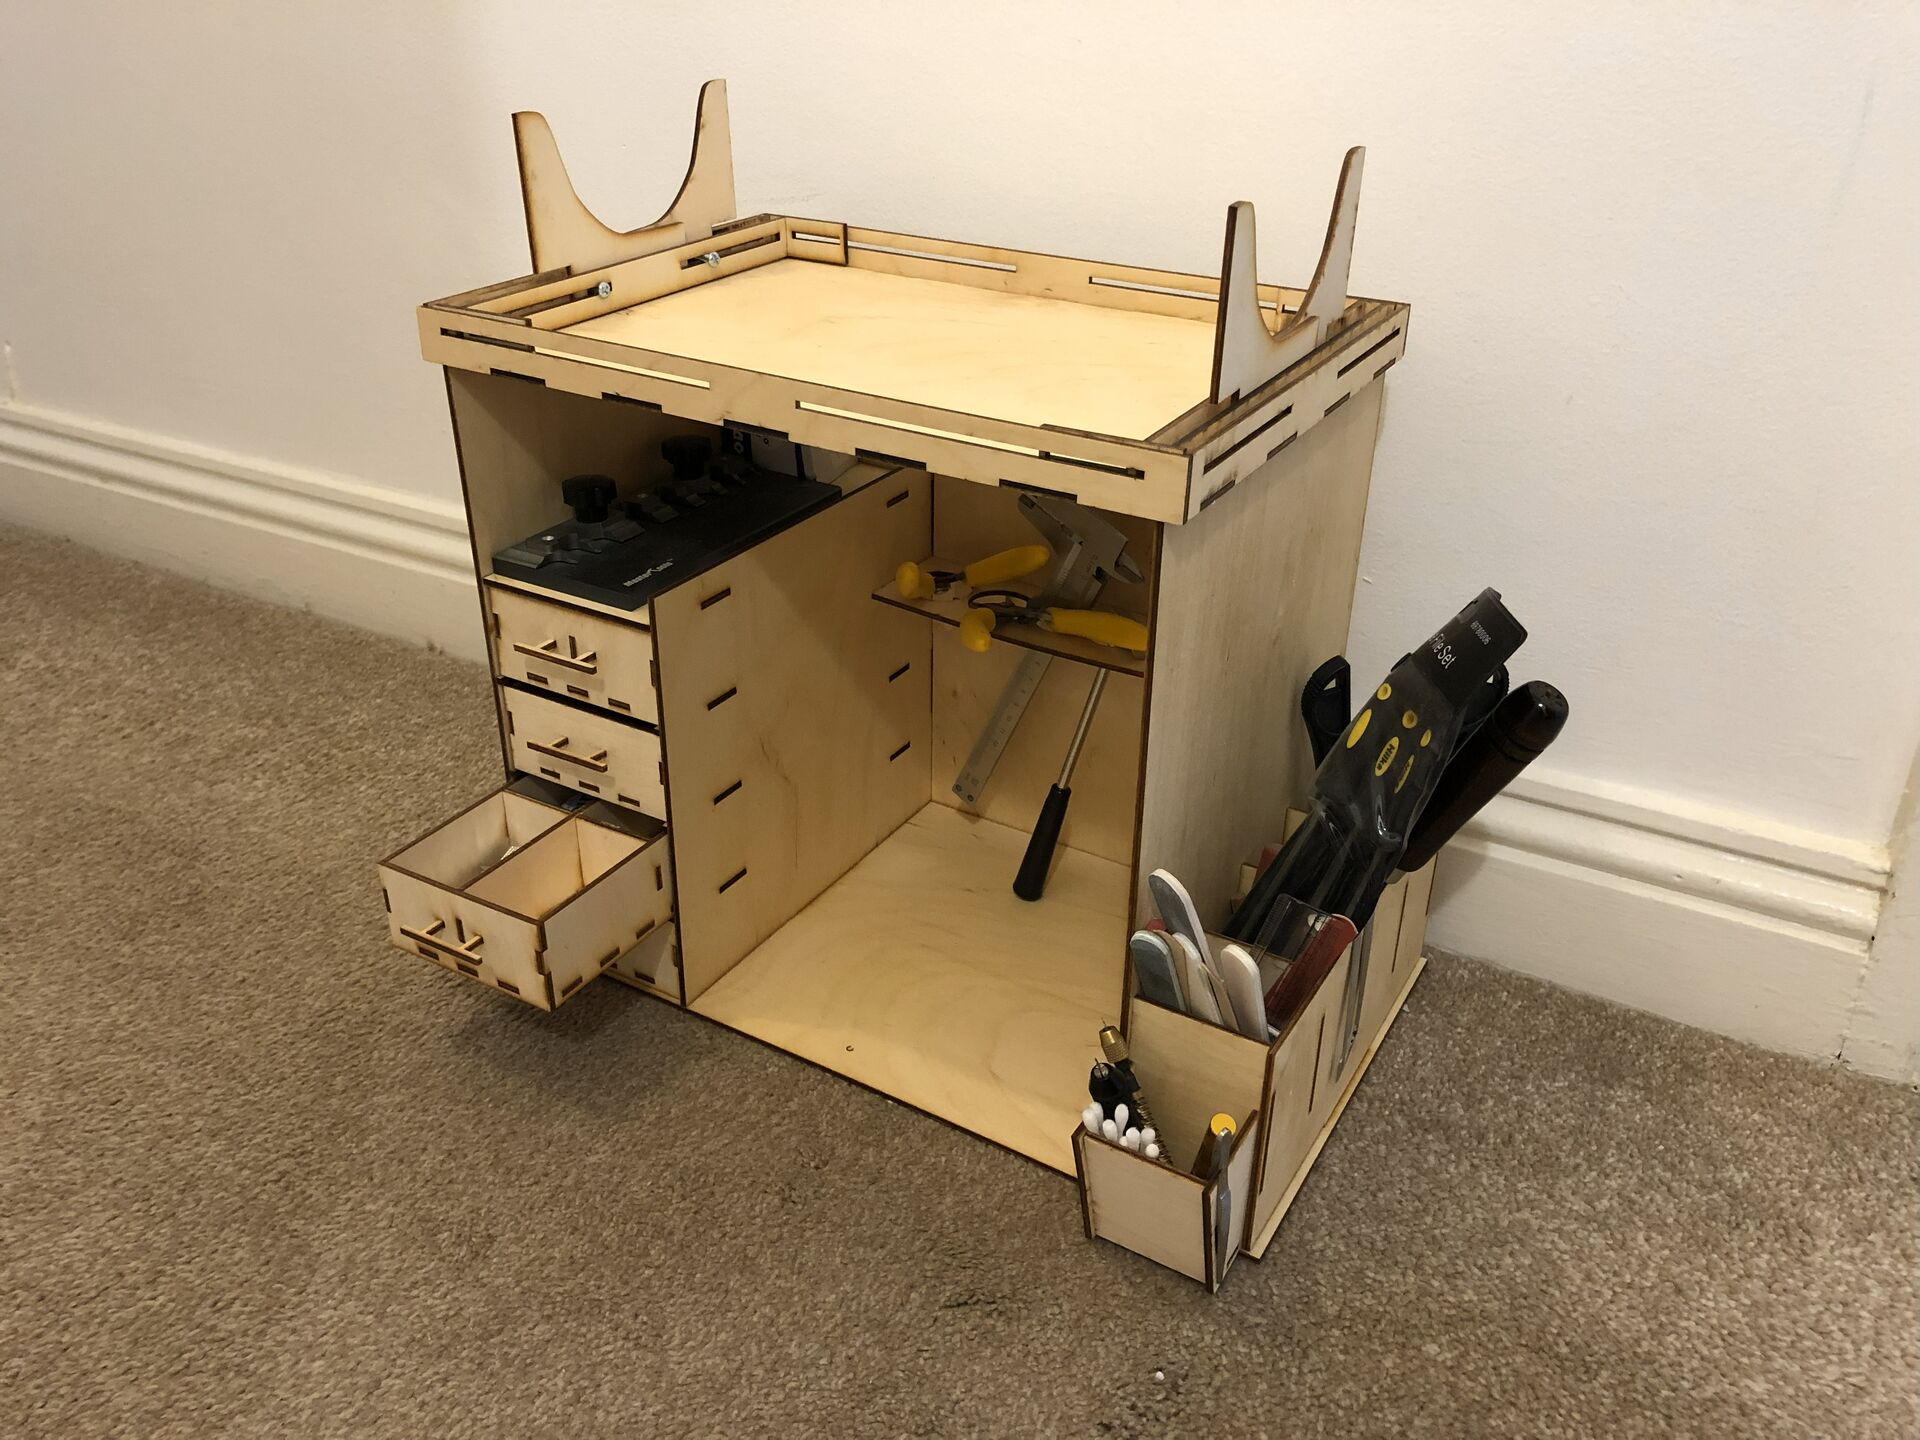
I was inspired by similar items from modelling companies. With the space limitations I had, all commercial cabinets were too big, so I designed my own version from scratch, and made it available on Thingiverse.
By far my most advanced laser-cutter project, fully designed from scratch in InkScape.
I still use it, and I know that other people built it from my design, which makes me very happy.
Display cases for my models

After I got access to the laser cutter, and discovered that you can buy transparent acrylic sheets on Amazon, I was delighted to start making my own display cases. Not only is this much cheaper, but I also could design perfectly fitting cases for each new model.
To simplify things, I used a wonderful Boxes.py generator, and then contributed a dedicated display case script that I wrote.
Since then, I have made cases for all but the biggest of my models.
Go board 9x9
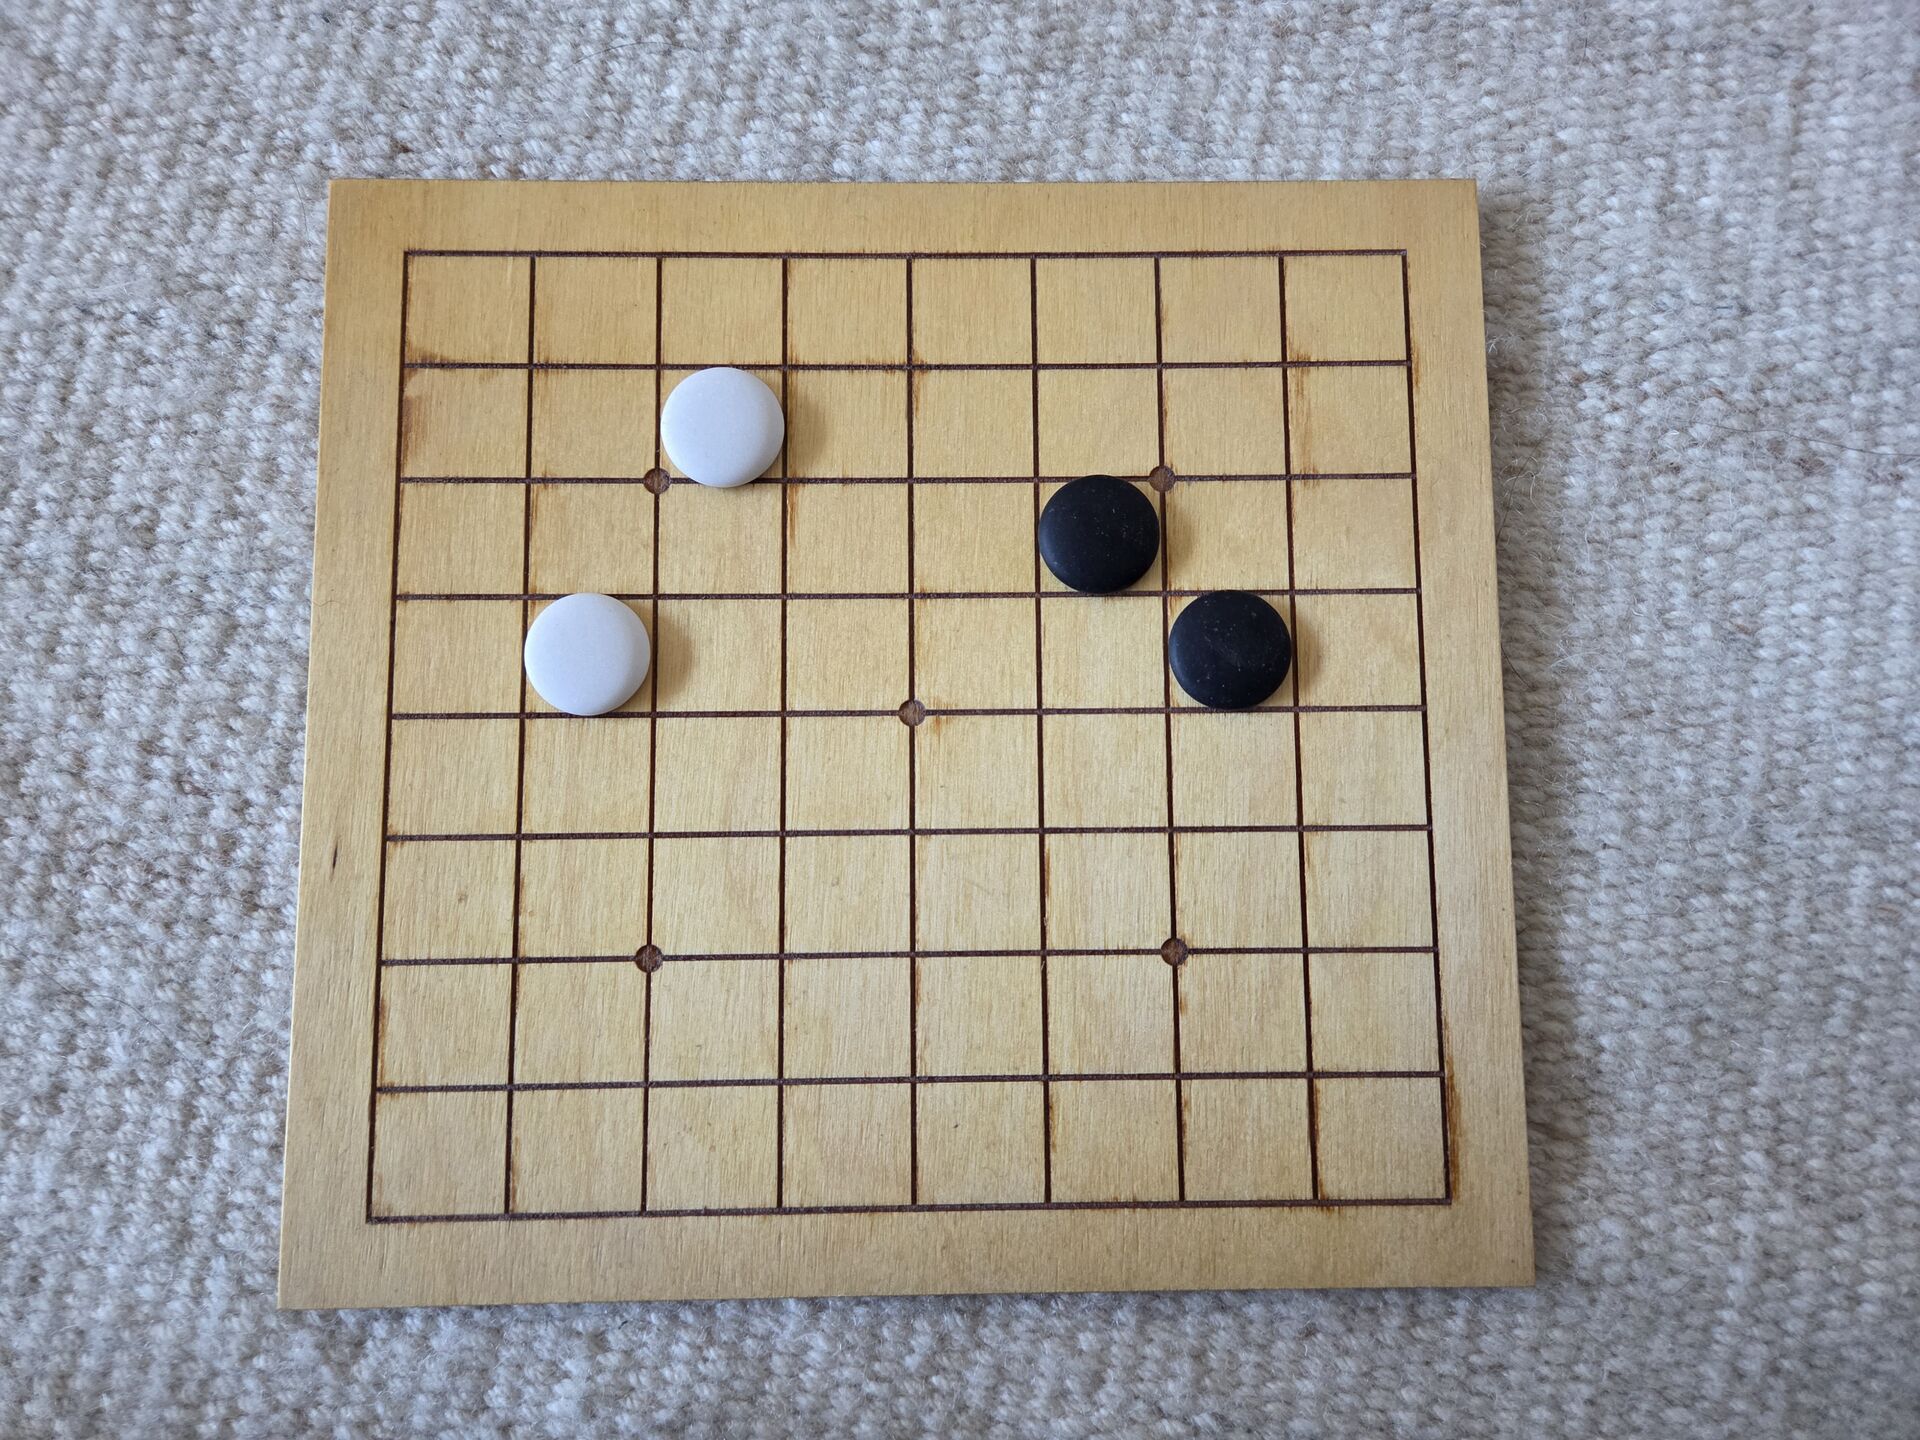
My wife and I wanted to play Go, so I found a free printable design for a 9x9 practice board, and engraved it on a sheet of 3 mm birch plywood. Finished with Danish Oil, turned out nicely.
We don’t play often, but at least we have the option.
Knife display case
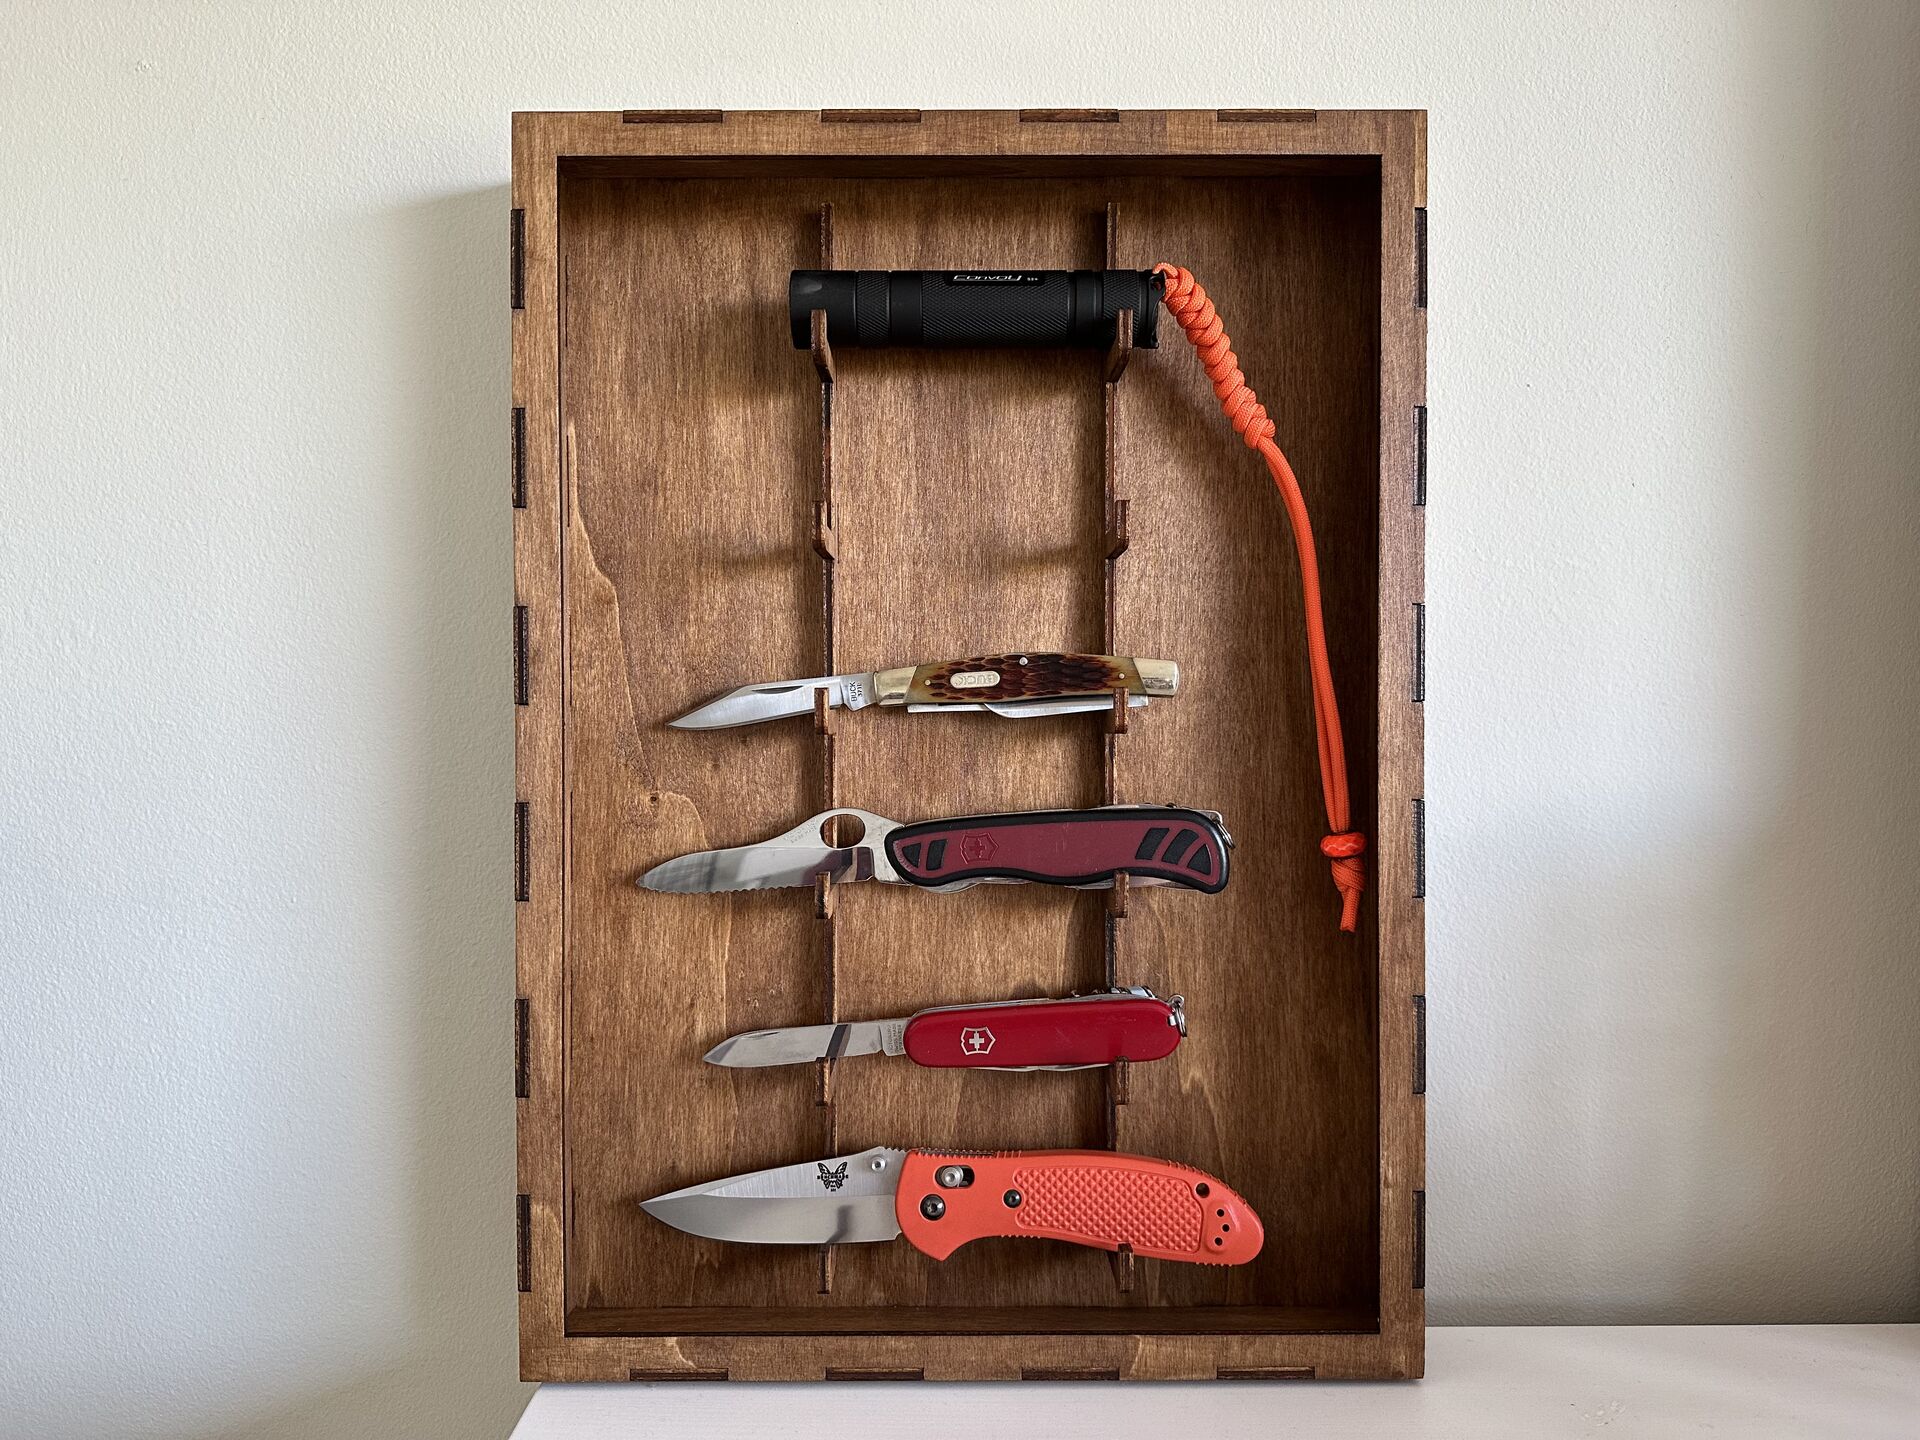
I used to collect folding knives. I don’t do it any more, because you can’t carry them in Ireland anyway.
But a small part of the collection remains, and to use it around the house I built a simple laser-cut display case, inspired by some commercial offerings.
Since it seemed generally useful, I made it available on Thingiverse.
Multi-tool display case
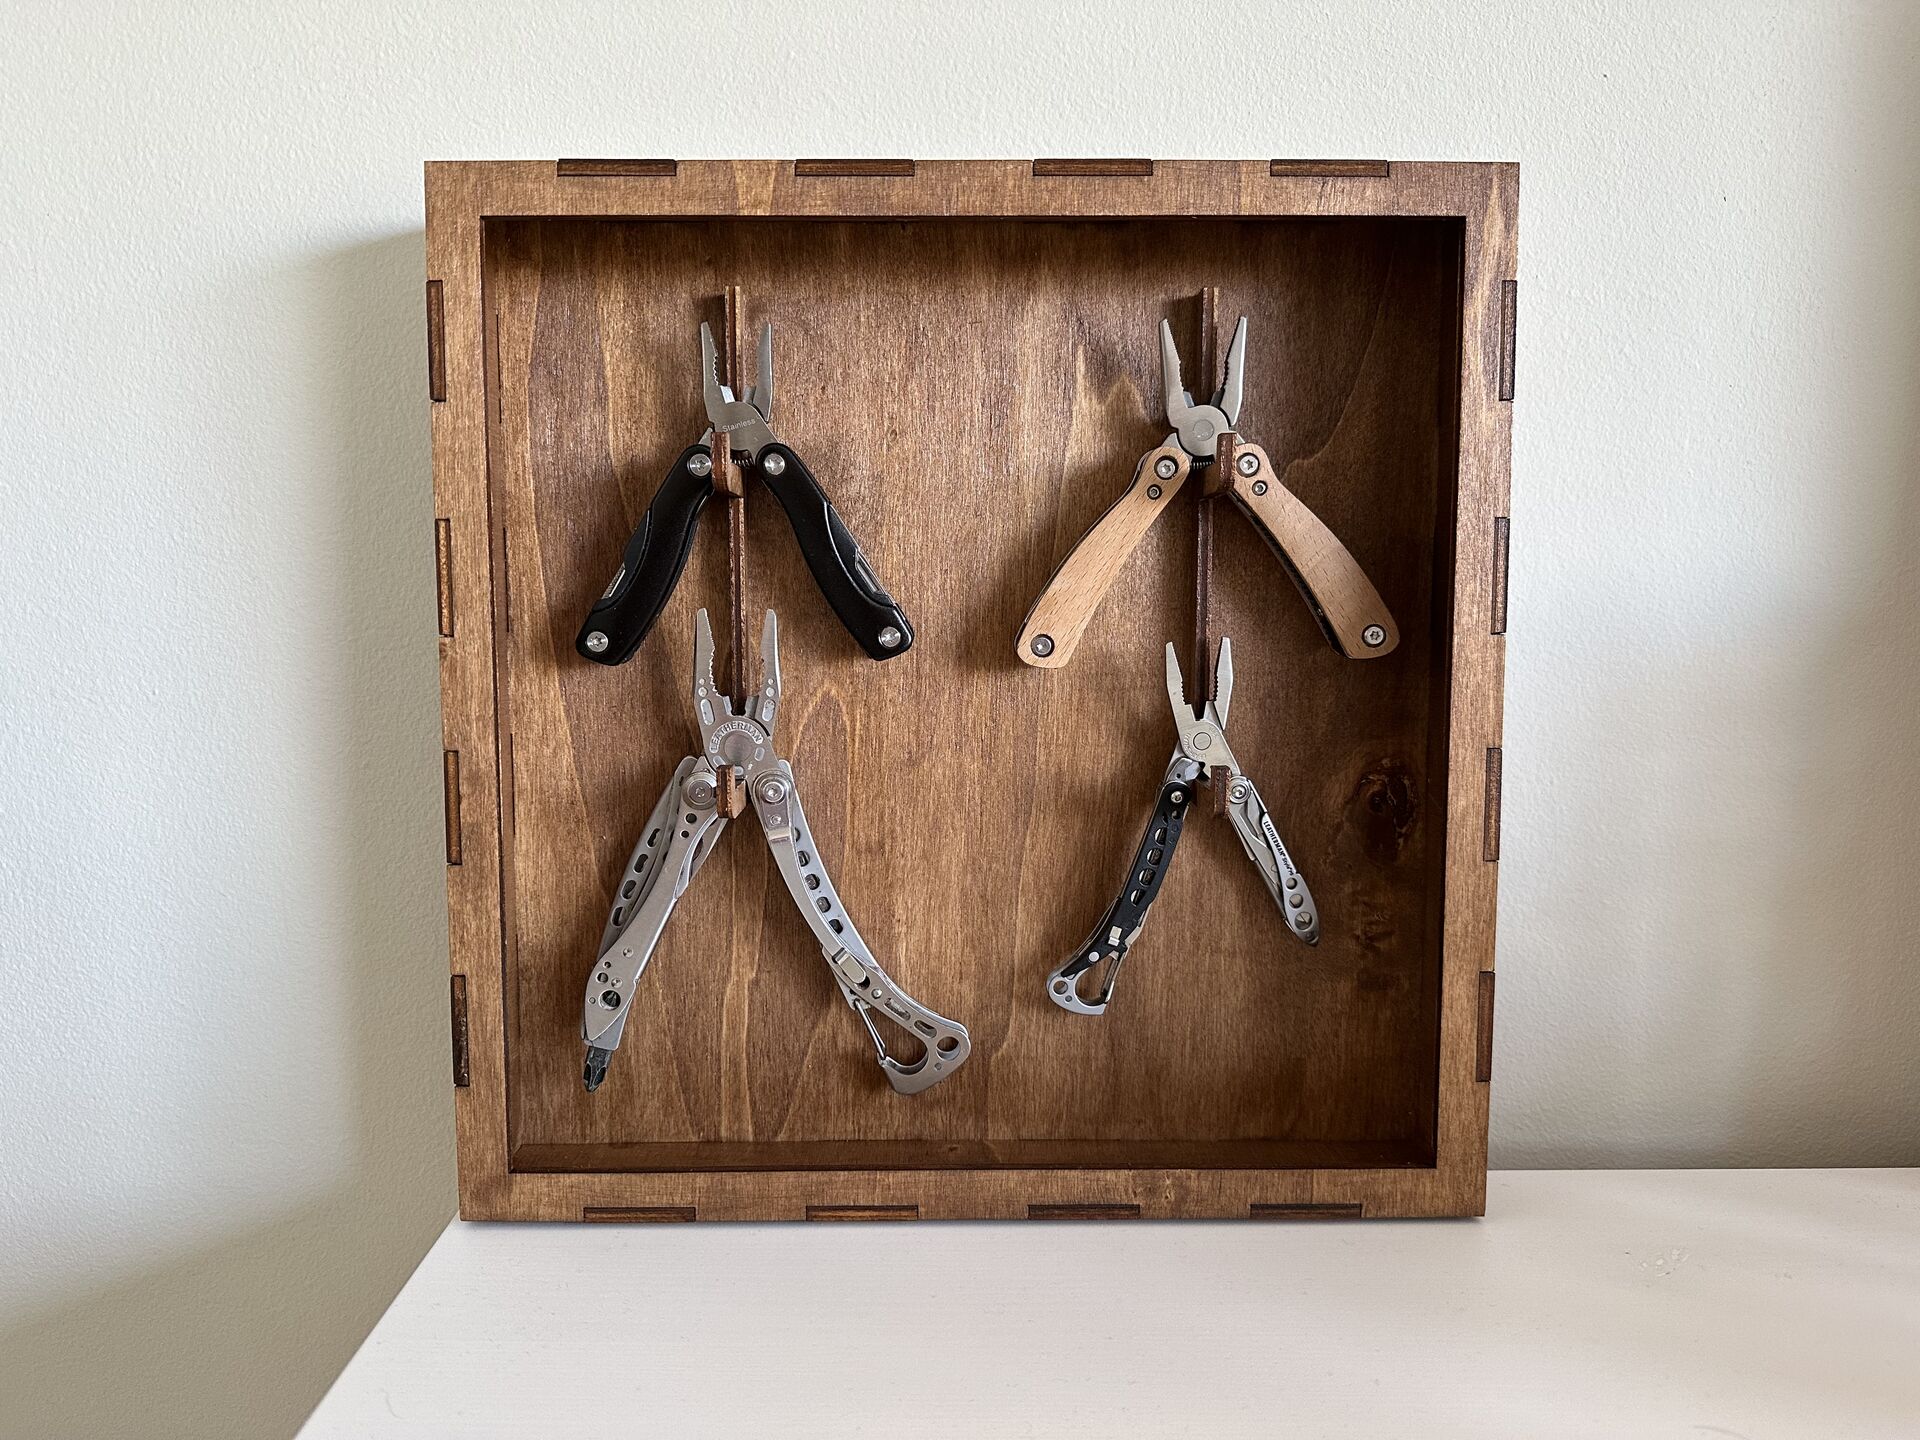
Same idea as with the knife display case, adjusted to common multi-tool sizes. Available on Thingiverse.
Radiator shelf
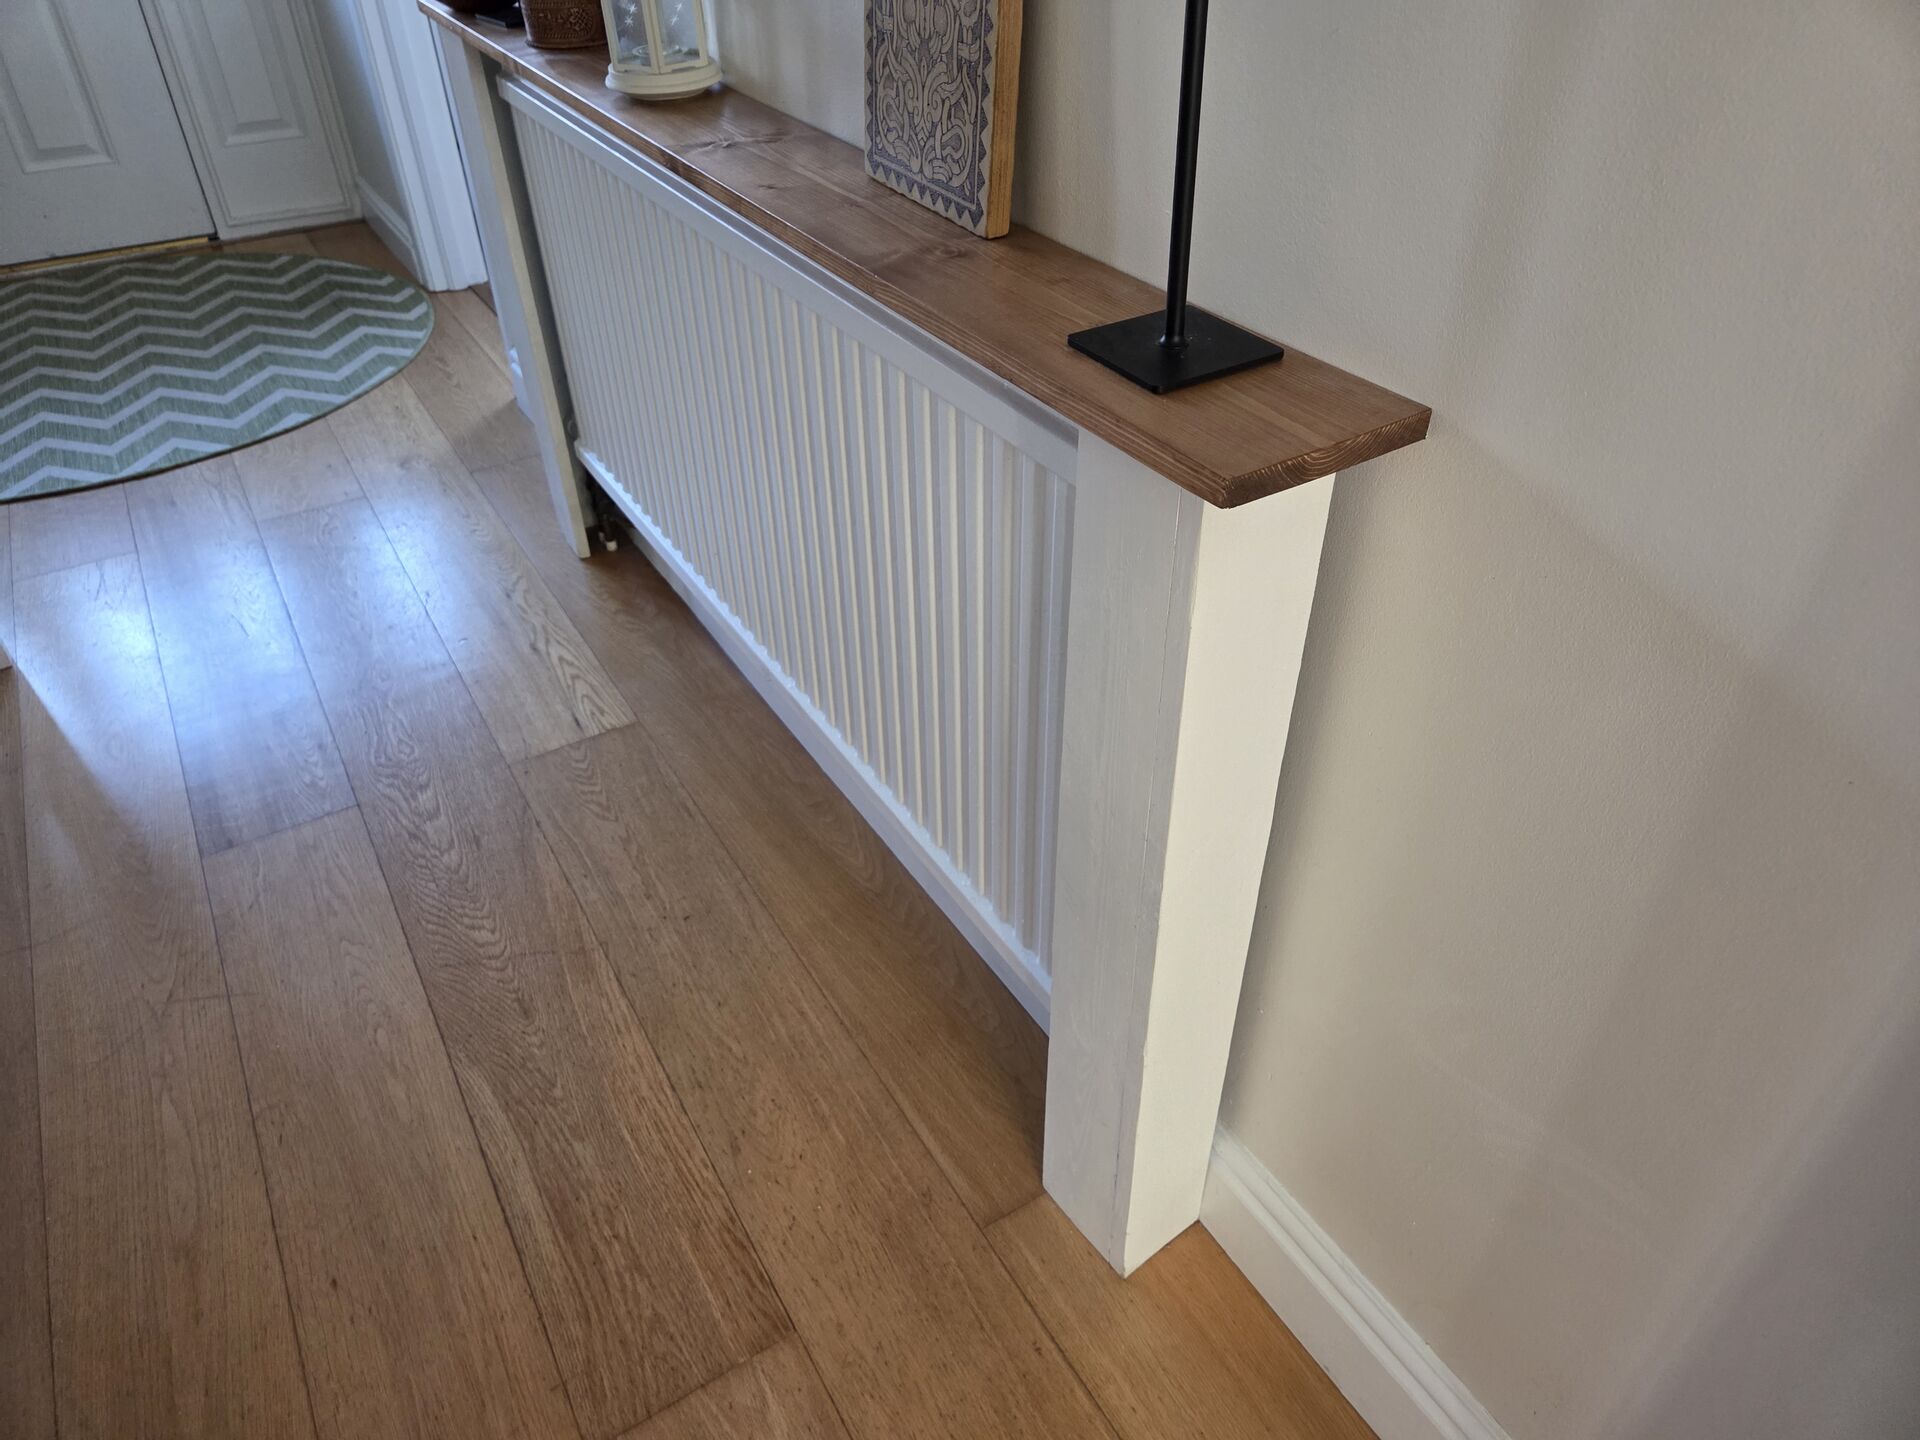
We wanted to have a shelf in the hallway, in a rustic style.
I had some pallet wood to use for the legs, and bought a nice long plank from Woodies for the shelf itself. Didn’t bother with the finish of the legs since we wanted it to look rustic.
The top is finished with oak stain and acrylic varnish.
Turned out great in my opinion, and cost like 30 EUR.
Vault-Tec door sign

As I’ve said, I’m a life-long Fallout fan.
One day I decided it would be cool to put a funny sign on my study’s door, given how my wife always calls it a man-cave.
Couple of hours with InkScape, and the design was ready.
One of the trickiest parts was finding an appropriate font. I settled on Roboto, as a good and free Futura substitute.
Each letter is fully cut, so that it is much easier to stain wood in batches.
The stains are Oak and Mahogany, the original plywood is poplar.
Watch box

A pinnacle of my woodworking projects.
Fully made from scratch with only hand tools.
Very proud of it, use it daily.
I posted a full build log here.
RGB headphone stand
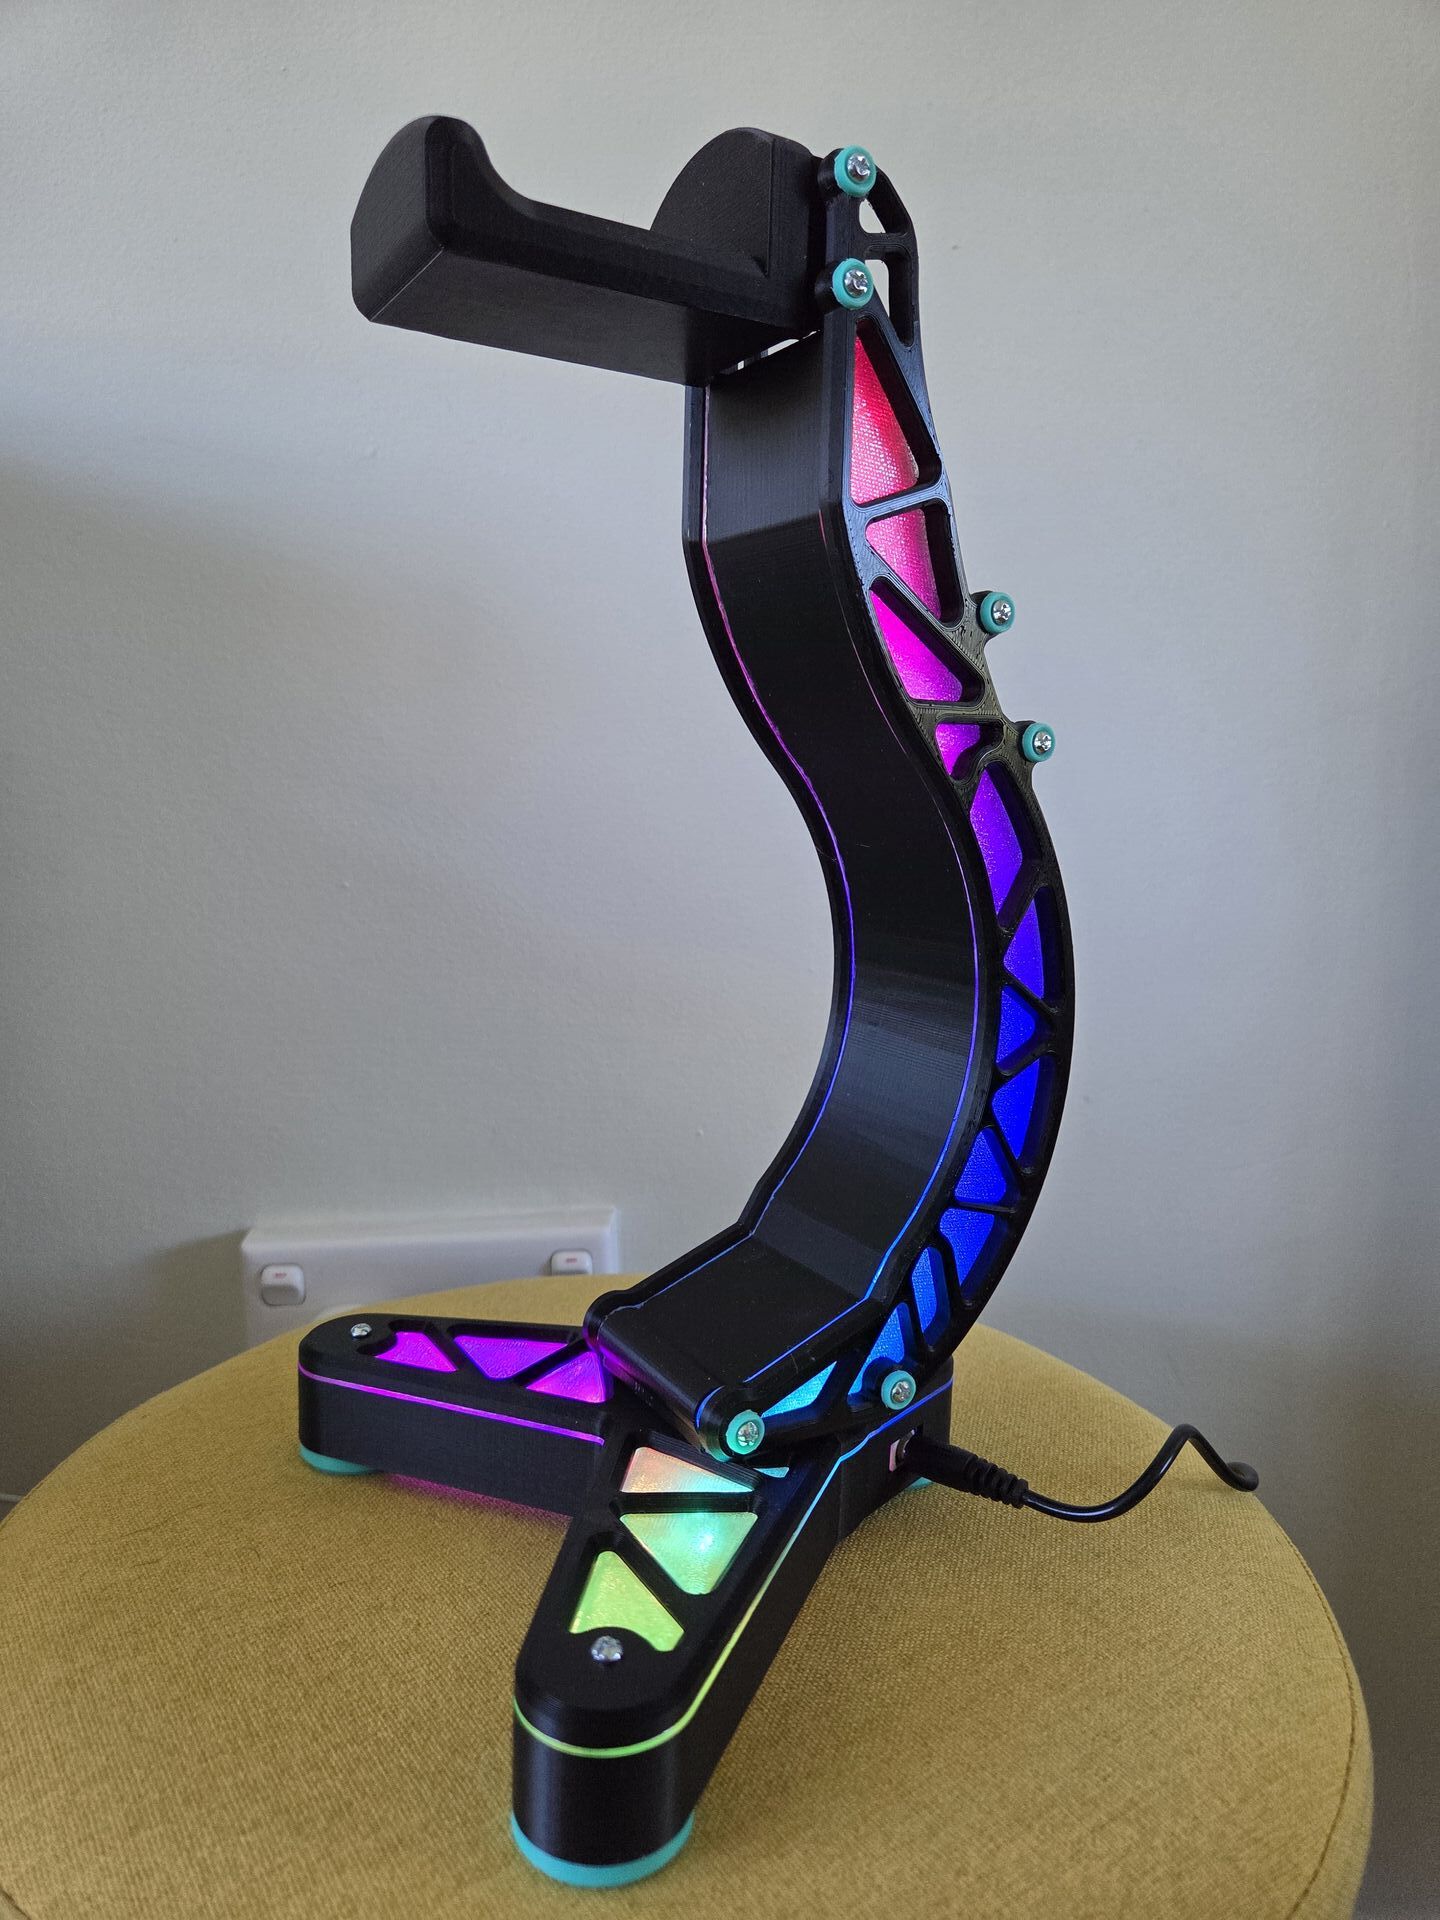
Not my original design, instead it’s a fork of a fork.
Basically, someone designed a really great looking headphone stand, then another person made an RGB lit version of it, and then I made an XL version of the RGB lit stand, using parts from both projects, and designing some more.
Took me a good few hours in TinkerCad to take the XL sides of the original stand, and design a version of side diffusers and front and back panels similar to the RGB stand.
Normally I would use OnShape to design anything for 3D Printing, but here since I was building on top of existing STL files, it seemed easier to use TinkerCad.
Framed meteorite
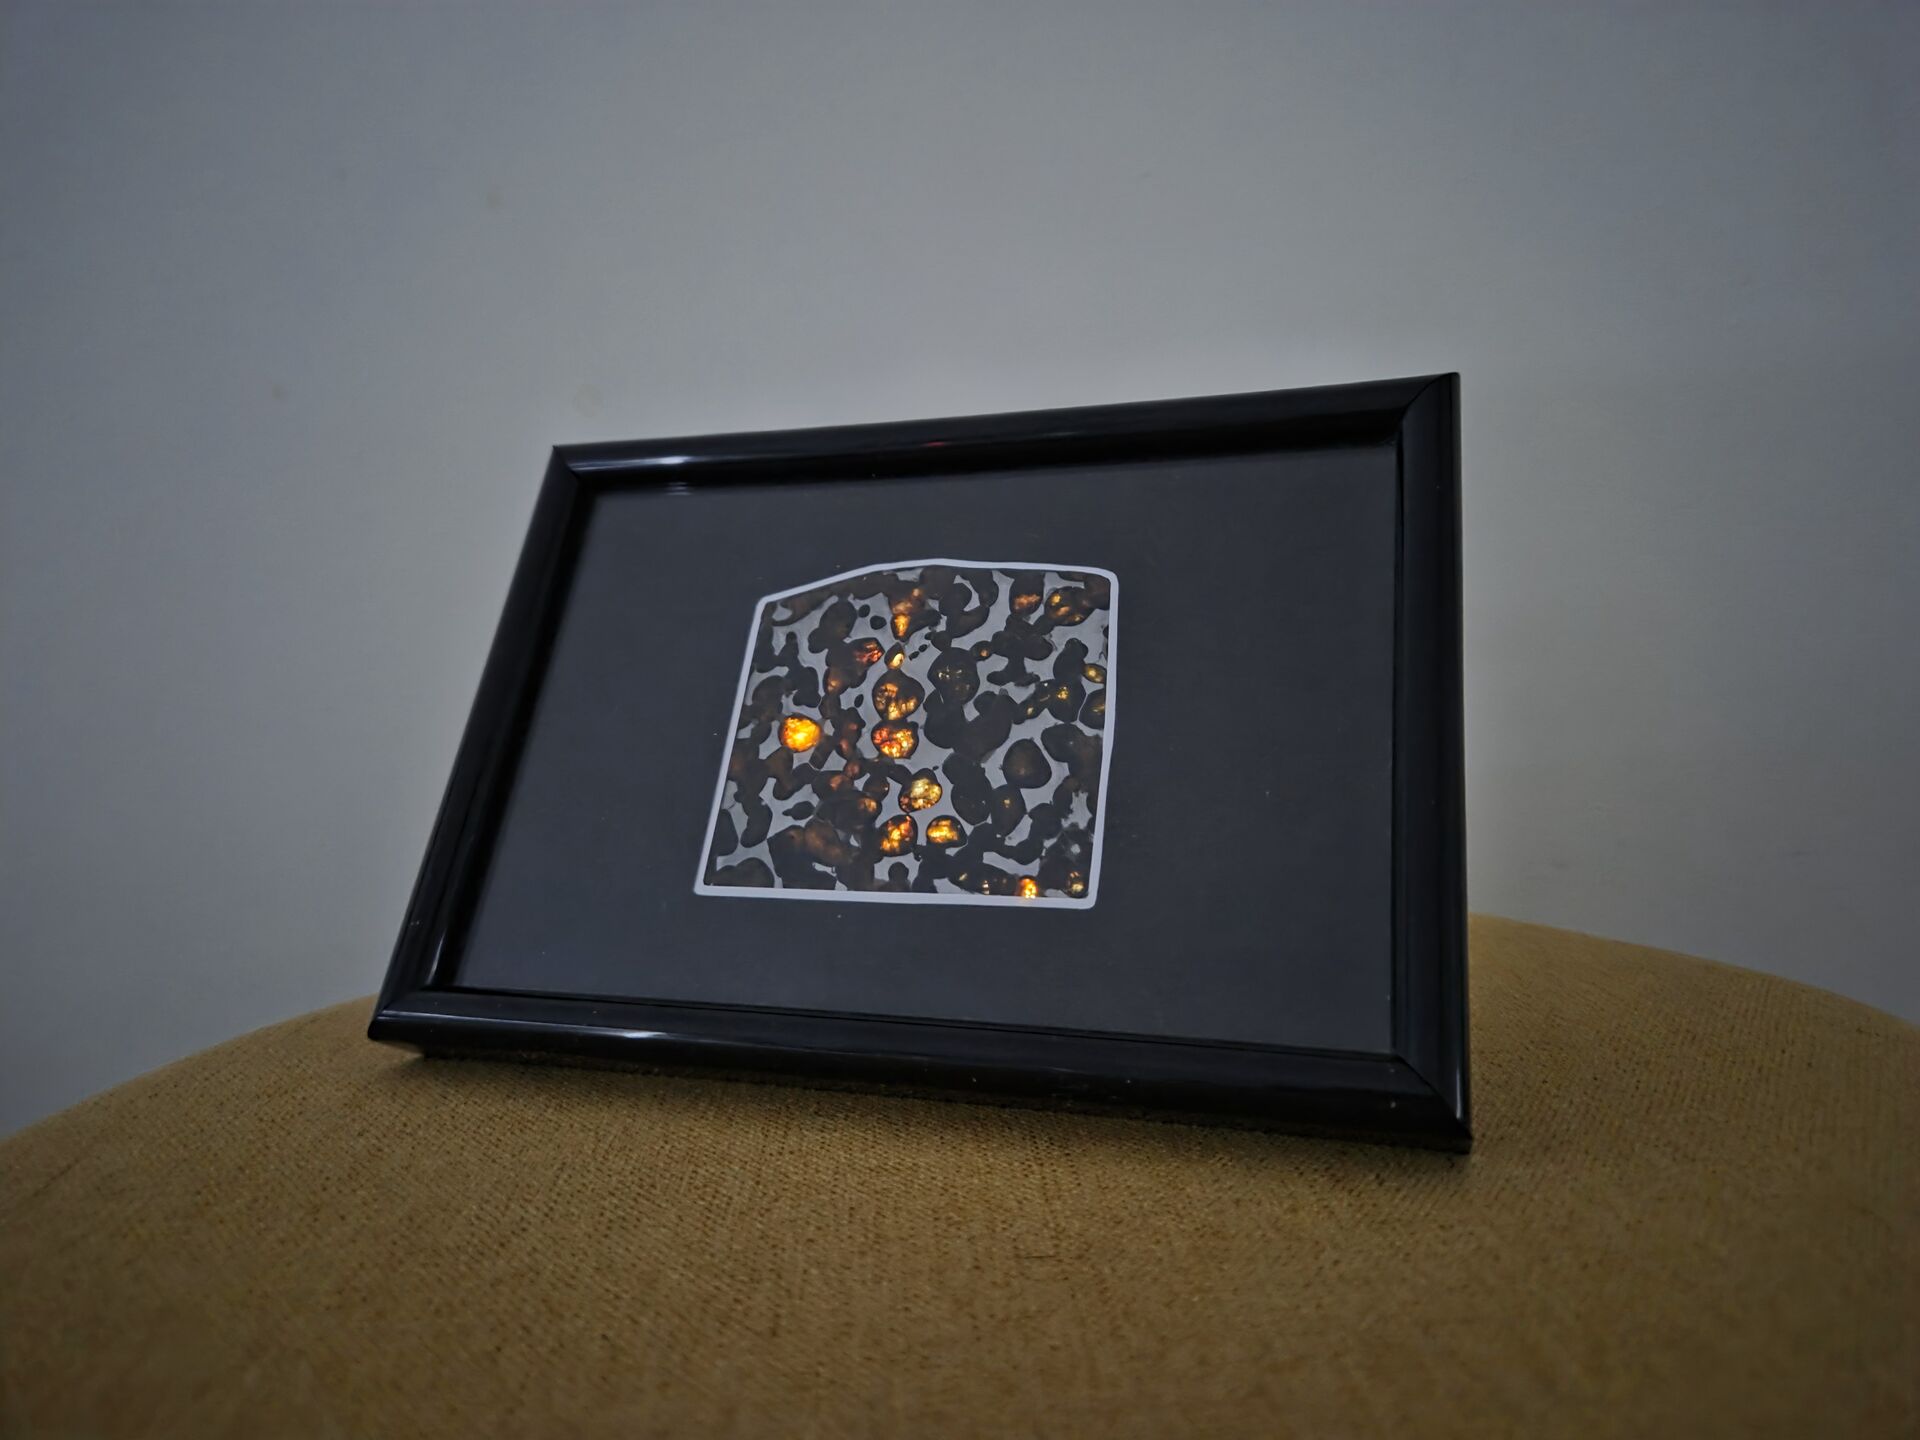
Made as a present for my wife, who loves all things space.
A real Pallasite meteorite slice, which I framed and back lit.
The frame is just a regular picture frame, and the meteorite is surrounded by black card stock from an arts store, with a thin white outline, which is a layer of regular paper below the card stock.
Each translucent olivine node is back lit by a dedicated white LED, all individually controlled by an Arduino board.
A single button on the back changes modes, from steady glow to shimmering, waves, pulse, and of course ‘off’ mode.